These 10 easy hair tutorial ideas for beginners are the ones worth learning first: a claw clip twist, a simple braid, a low bun, heatless waves and a quick blowout. Each one takes under 15 minutes, needs three tools or fewer, and works on straight, wavy, curly or coily hair.
Most styling videos skip the part that actually matters, which is how to hold your hands. Below is the slow version of each style, with the exact steps, the mistakes that make it collapse by lunchtime and the small habits that keep it in place until evening.
What you need before you start
Beginners lose more time hunting for tools than styling. Put these five things within arm’s reach of the mirror and you can attempt every tutorial on this list.
- Wide-tooth comb. For wet and dry detangling without snapping strands.
- Claw clip. Medium size, strong spring. It holds more hair than it looks like it will.
- Fabric hair ties or a silk scrunchie. Softer than thin elastics, which crease and pull.
- Bobby pins. Buy the ridged kind. Smooth pins slide straight out of fine hair.
- Heat protectant spray. Non-negotiable before any iron or dryer.

Skip the multi-attachment hot air brush for now. It is harder to control than a plain round brush, and most beginners give up on it in week two. One inexpensive flat iron and one round brush will carry you through this entire list.
The 10 easy hair tutorial ideas for beginners
Work through them in this order. The first four build hand control, and everything after that gets easier.
1. The one-minute claw clip twist
Gather your hair at the nape as if making a low ponytail, then twist it upward until it coils against your head. Clamp the clip over the twist so it grabs the coil and the hair underneath. Pull two thin strands loose at the front before you let go. This reads as a soft French twist and takes less time than finding a hair tie.
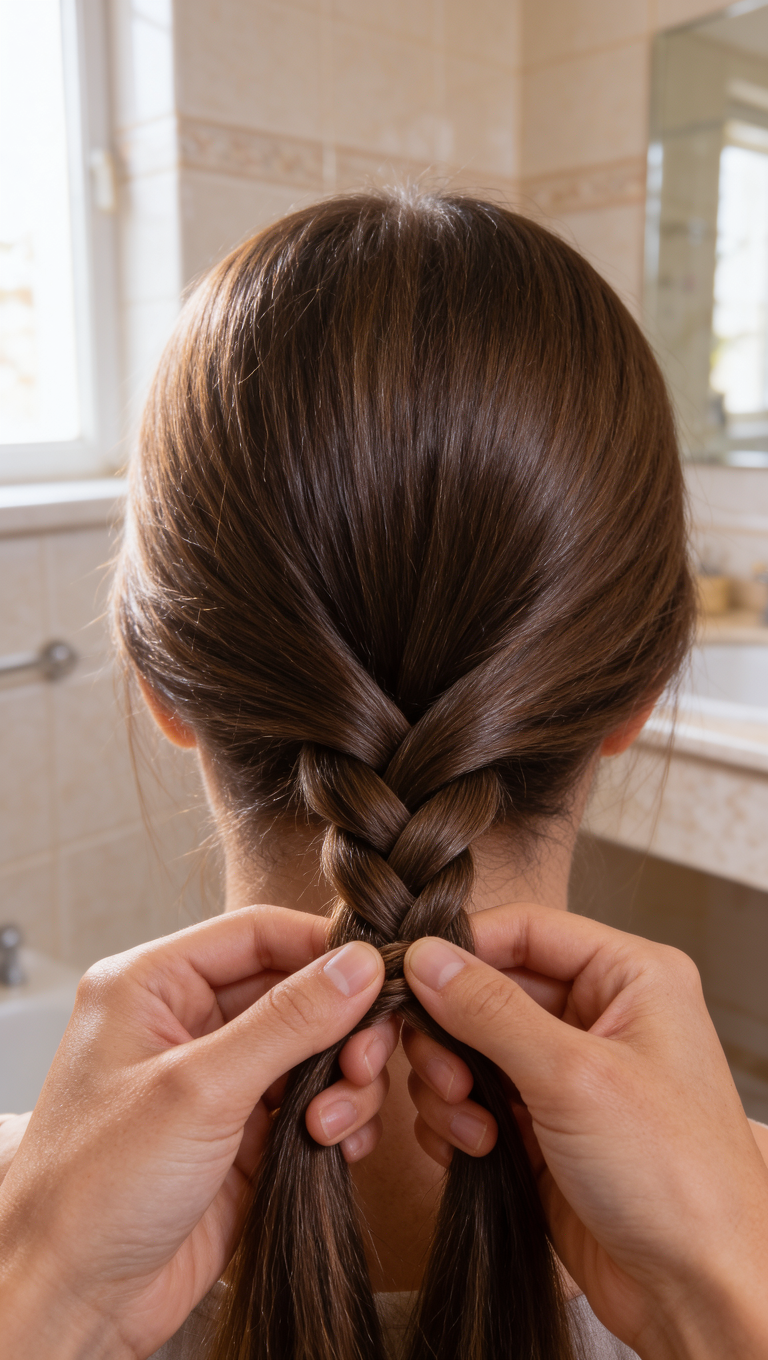
2. A basic three-strand braid
Comb the hair smooth, split it into three even sections and cross the right section over the middle, then the left over the middle, repeating to the ends. Keep your hands close to the head instead of pulling outward, which is what makes a braid lumpy. Secure the tail with a fabric tie and gently widen each crossing with two fingers for a fuller braid.
3. The low sleek bun
Brush everything into a ponytail at the middle of the back of your head, not at the neck, then twist the tail around the base and pin it flat. Two pins placed at four o’clock and eight o’clock hold better than five pins clustered at the top. Finish with a light mist of flexible hold spray rather than a stiff gel.
4. Heatless waves while you sleep
Dampen the mid-lengths and ends, wrap small sections around a silk scrunchie or a soft fabric band, and sleep on them. Unwrap in the morning and shake out with your fingers, never a brush. This is the safest way to get waves if your hair is dry, fine or colour-treated, because it avoids the heat damage dermatologists warn about in the AAD’s healthy hair guidance.
5. Half-up top knot
Take the top third of your hair from ear to ear, tie it high, then loop the tail only halfway through on the second pass. Fan the loop out and pin the loose end under it. Keep the rest of the hair down, which makes this the fastest way to look styled on a wash day.
6. Ponytail with a wrapped base
A plain ponytail looks unfinished because the elastic shows. Tie it, then take a one-inch section from the underside of the tail, wrap it around the base to cover the elastic and pin the end underneath. It takes thirty seconds and instantly looks deliberate.
7. The messy bun that actually holds
Use two ties: one for the ponytail, one to secure the looped bun. Pull the loop only partway through on the second tie so the bun has structure, then pin the loose tail around the base. Texture is the secret, so add a texturizing spray before you start rather than fighting slippage afterwards.
8. Two-minute waves with a flat iron
Clamp a section near the root, rotate the iron a half turn away from your face and glide down, then repeat on the next section in the opposite direction. Alternating the direction is what stops the hair from clumping into one solid shape. If you want a softer, more layered finish, a little layered cut gives waves somewhere to fall.
9. Braided headband
Braid a one-inch section from just above one ear, drape it across the crown and pin it behind the opposite ear, tucking the tail under the loose hair. It hides a greasy root line, keeps shorter pieces out of your face and looks far more complicated than it is.
10. The beginner blowout with a round brush
Dry hair to about 80 percent first, then work in two-inch sections, holding the brush under the section and the nozzle pointing down the hair shaft. Finish each section with a blast of cool air for three seconds to set the shape. The cool shot is the step beginners skip, and it is the one that makes a blowout last a second day.
| Tutorial | Time | Tools |
|---|---|---|
| Claw clip twist | 1 minute | Clip |
| Three-strand braid | 4 minutes | Comb, tie |
| Low sleek bun | 3 minutes | Brush, pins, tie |
| Heatless waves | 5 minutes at night | Scrunchies |
| Half-up top knot | 2 minutes | Tie, pins |
| Wrapped ponytail | 2 minutes | Comb, tie, pin |
| Messy bun that holds | 3 minutes | Two ties, pins |
| Flat-iron waves | 8 minutes | Flat iron, spray |
| Braided headband | 5 minutes | Comb, pins |
| Beginner blowout | 15 minutes | Dryer, round brush |
Tips that keep each style in place all day

- Style day-two hair. Clean hair slips out of every updo. A little natural oil gives braids and buns something to grip.
- Set with cool air. Ten seconds of cold air after heat sets the shape and reduces frizz.
- Pin against the direction of the hair. Insert bobby pins with the ridges facing your head so they lock in place.
- Do not over-tighten. Styles that pull hard cause tension and breakage, which is the most common reason beginners lose length over time. The AAD’s list of damaging habits is worth a read before you make tight ponytails your default.
- Carry two pins and a fine mist. A two-second refresh at lunch solves almost every collapse.
If you want more finished looks once these basics feel automatic, these long hairstyle ideas build directly on the same four skills: sectioning, twisting, pinning and setting.
Beginner mistakes to avoid

- Brushing wet hair. Use a wide-tooth comb and start at the ends, working upward.
- Skipping heat protectant. Damage is cumulative and shows up months later as split, thinning ends.
- Sectioning too thick. Thick sections are why waves fall out and blowouts look frizzy.
- Using one hand only. Braiding gets faster the moment both hands work at the same time.
- Chasing viral styles before basics. Learn the braid, then the bun, then everything else.
Frequently asked questions
How long does each tutorial take?
Between one and fifteen minutes. The claw clip twist and wrapped ponytail are under three minutes, the braid and bun take three to five, and a full beginner blowout takes about fifteen. Practise the braid three times in one sitting and the time roughly halves.
Do these work on curly or coily hair?
Yes, with two changes. Detangle while the hair is wet and conditioned rather than dry, and use a leave-in cream before twisting or braiding so the pattern stays defined. Skip the flat-iron tutorial if you are avoiding heat entirely.
Why does my bun or braid fall out by lunchtime?
Usually because it was styled on freshly washed, very slippery hair, or because only two pins were used where four were needed. Day-old hair, texturizing spray and ridged pins fix most of it.
What if my hair is too short or layered for these styles?
Start with the half-up top knot, the braided headband and the claw clip twist, which need the least length. Shorter layers also make a padded headband or a small claw clip surprisingly effective.
Can I sleep in these styles?
You can sleep in heatless waves and a loose braid. Avoid sleeping in tight ponytails, buns or braids night after night, because the constant tension can damage the hairline over time.
Start with two, not ten
Pick the braid and the low bun, and do only those for a week. Once your hands know the motion, the other eight 10 easy hair tutorial ideas for beginners on this list take one attempt each. Ten minutes of practice now saves a rushed twenty every morning later, and it is the difference between a style you can trust on a work morning and one you only attempt when nobody is watching.