
You’ve seen the smooth, sculpted faces on your feed and wondered if gua sha actually delivers. It does—but only when you go beyond casual scraping. A complete routine transforms this ancient practice into a daily ritual that reduces puffiness, lifts contours, and melts away jaw tension. No gimmicks, no fifteen-step mysteries. Just purposeful movement and a tool that works with your skin’s natural rhythms.
This isn’t about aggressive rubbing or chasing Instagram perfection. A genuine gua sha complete routine respects your face’s anatomy, encourages lymphatic drainage, and creates a moment of stillness in your day. When done correctly, you’ll notice less morning bloating, a softened brow ridge, and a glow that no serum alone can produce. Let’s walk through the pillars of a practice that actually sticks. Many people give up after a few tries because they feel no difference, but that almost always comes down to skipping steps or using too much pressure. By the end of this guide, you’ll understand exactly why each movement matters and how to make them work for your unique face.
1. Preparing Your Skin and Tool for Success
Before the stone ever touches your face, preparation determines half your results. Start with clean, slightly damp skin—right after washing or spraying a fine mist of water. Then add a slippery, non-absorbent oil or gel. This isn’t the time for thick creams that dry down quickly. Without enough slip, you’ll drag instead of glide, which can cause redness or micro-tears. Many people love jojoba, squalane, or a simple grapeseed oil because they let the tool float effortlessly over contours. Avoid coconut oil if you’re prone to breakouts, as it can clog pores despite its popularity. A few drops are enough; too much oil makes the tool hard to control, while too little creates friction.
Your gua sha tool also needs attention. Wash it with mild soap and warm water before every session. Over time, lingering oil and bacteria dull both the stone’s surface and your skin’s health. Ideally, store it in a clean, dry place away from steam. A cold stone can be lovely for de-puffing, but extreme cold can tighten muscles into knots. Room temperature works beautifully for a complete routine that prioritizes relaxation over shock. Once you’ve oiled your face and prepped your tool, you’re ready to move with intention. Some people like to set a mood with soft lighting or a few deep breaths before they begin. That’s not fluff—it actually helps your nervous system relax, which makes the physical release deeper and more effective. Think of preparation as the foundation of a house: skip it, and everything else wobbles.
2. Mastering the Neck and Collarbone Gateway

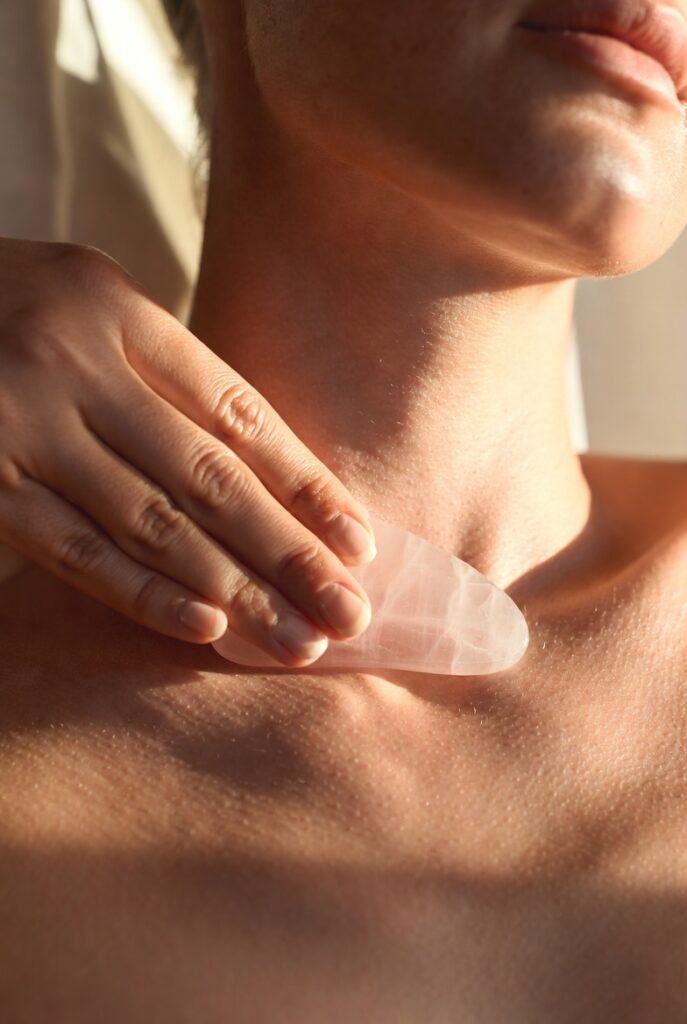
Your lymphatic system has no built-in pump—it relies on movement to drain fluid. That’s why every gua sha complete routine begins not on the cheeks, but at the neck. Use the tool’s curved edge to stroke from the base of your skull down toward your collarbone, using light to medium pressure. Repeat five to seven times on each side. This opens the “drains” for facial fluid, preventing that puffy, heavy feeling that often settles under the chin and around the eyes. Without this step, you’re essentially pushing water into a closed room. Imagine filling a sink with the stopper still in place—that’s what happens when you start on your cheeks. The fluid has nowhere to go, so your face stays puffy or even swells more.
After the neck, sweep from your collarbone outward toward your shoulders and armpit lymph nodes. Hold the tool almost flat against the skin, and move slowly—about one inch per second. Many people rush here, but speed reduces effectiveness and can feel jarring. When you treat these initial strokes as a grounding ritual, the rest of the face responds more visibly. You’ll notice fewer breakouts along the jawline and a sharper definition where the neck meets the chin. Some first-timers worry about bruising, but that’s almost impossible with this light pressure. What you might feel is a slight tenderness in the neck muscles if you hold a lot of tension there. That’s a sign the technique is working. Over weeks, those tender spots soften and your neck feels longer and more open. Don’t skip this gateway just because you’re eager to see cheekbone results—patience here pays off faster than you think.
3. Sculpting the Jaw and Releasing Clenching Tension
The jaw holds more daily stress than almost any other part of your face. Start with the flat or comb edge of your gua sha tool. Anchor it under your ear, then drag forward along the jawbone toward your chin. Use a small scooping motion at the end to lift slightly. Repeat five times on each side. You’re not scrubbing—you’re coaxing stagnant fluid toward the lymph nodes you already opened in your neck. Over several days, this reduces the “moon face” appearance and softens a tight, clenched feeling. Many people don’t realize they clench their jaw until they try gua sha and feel a deep ache releasing. That ache is actually the muscle letting go of hours—or years—of bracing.
For deeper tension, angle the tool’s notch over the masseter muscle (the bulging part when you bite down). Hold gentle pressure there for three slow breaths, then make tiny back-and-forth movements no longer than a quarter inch. This is not a massage stroke but a tissue release technique. People who grind their teeth or work long hours at a screen often feel an immediate “letting go” sensation. Combine this with the jawline strokes, and your complete routine begins to reshape not just fluid, but muscle memory. Over time, you might notice that you stop clenching as much during the day. Your jaw sits in a more relaxed position naturally. This isn’t just cosmetic—chronic jaw tension can lead to headaches, ear pain, and even worn-down teeth. By spending two minutes on this area three times a week, you’re investing in long-term comfort. And yes, the sharp jawline that emerges is a lovely bonus.
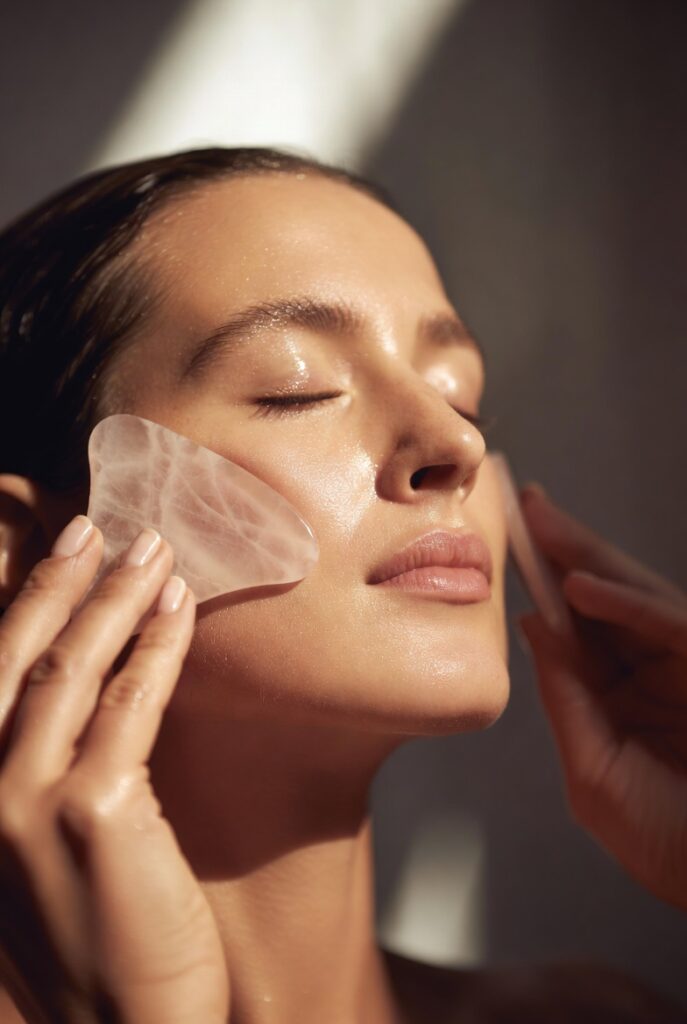
4. Lifting the Cheekbones and Midface Contour
Now move to the most celebrated area: the cheekbones. Use the long, inner curve of the tool. Place it at the side of your nose, flush against your cheek. Glide outward and slightly upward along your cheekbone, ending near your ear. Keep the angle low—almost parallel to the floor—to avoid poking your eye. Do this six to eight times per side. The goal is lymphatic mapping, not skin stretching. If you see red streaks or feel tugging, add more oil and lighten your touch. Many people press too hard here because they think deeper pressure equals better results. In reality, gua sha works best with the weight of the tool alone, plus just enough extra pressure to feel a gentle drag. Think of ironing silk: you want smoothness, not force.
After the long strokes, switch to a C-shaped scoop under the cheekbone hollow. This targets the area where fluid pools overnight. Hold the tool vertically, notch hugging the bone, and make small crescent motions from nose to ear. You might feel tiny gritty bits—that’s fascia and lymph waking up. Over weeks, these movements add visible lift without needles or injections. The gua sha complete routine shines here because consistent gliding trains the skin’s elastic fibers to rest in a more elevated position. Don’t expect dramatic changes after one session. But after ten sessions, compare a photo. You’ll likely see that your cheekbones appear more prominent and the hollows under them less shadowed. This is also the area where people notice better product absorption afterward. Your serum sinks in faster because you’ve physically encouraged circulation. So not only do you look more sculpted, but your skincare works harder, too.
5. Soothing the Under-Eyes and Brow Bone
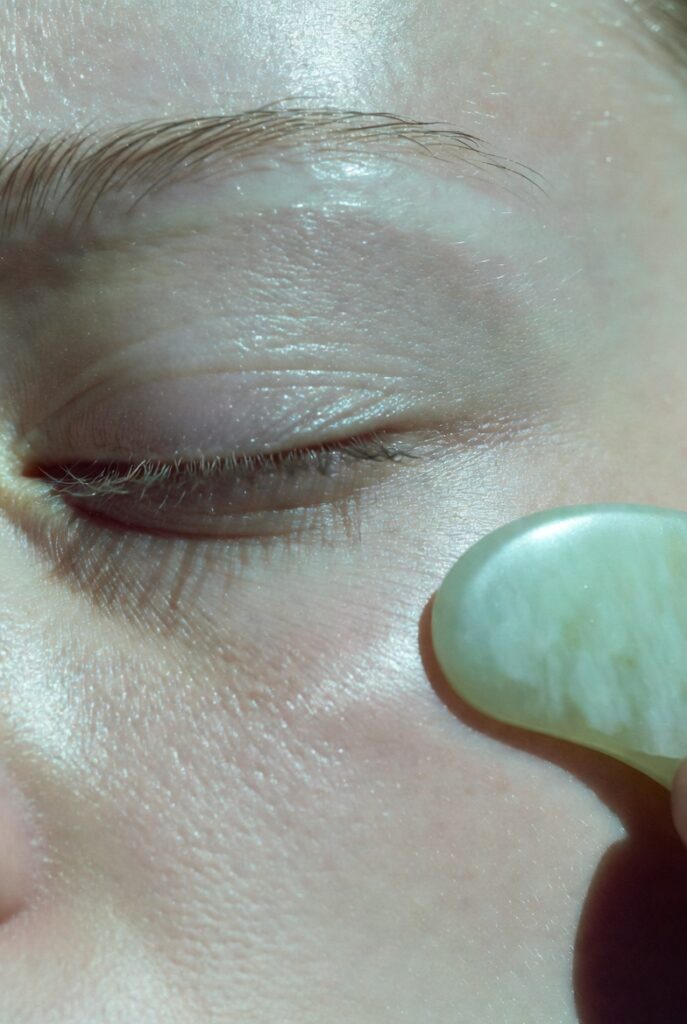
The under-eye zone demands the lightest touch—think of petting a butterfly’s wing. Use the smallest curved edge or the tool’s tip. Apply almost zero pressure, just enough to make skin contact. Sweep from the inner corner under your eye, following the orbital bone out toward your temple. Never go backward or push toward the nose; that would worsen bags. Three to four featherlight strokes per eye, and stop immediately if you feel any resistance. Over time, this reduces dark circles by moving stagnant blood, not by bleaching pigment. If you have active allergies or extremely thin skin under your eyes, consider skipping this area altogether or using only your ring finger. The tool can be too intense for fragile capillaries.
Finish the eye area by working the brow bone. Place the tool’s flat side horizontally above your eyebrow. Glide from the center of your forehead out toward your hairline, then repeat along the brow itself. Many people carry tension in the corrugator muscles (the “elevens” between brows). Sweeping across the brow releases that furrow without harsh pressure. After a few weeks, you may notice that you unconsciously frown less. That’s the quiet magic of a complete routine—it retrains both tissue and habit. Some users report that their eyebrows appear slightly more lifted after consistent work. That’s because the muscles above the brow relax, allowing the skin to smooth out. You don’t need to spend more than thirty seconds on this entire eye-and-brow segment. Less is more. If you feel pulsing or see dark circles worsen temporarily, take a break for a few days—that can happen when lymph moves too fast and overwhelms local drainage. Resume with even lighter strokes.
6. Sweeping the Forehead for Mental Clarity
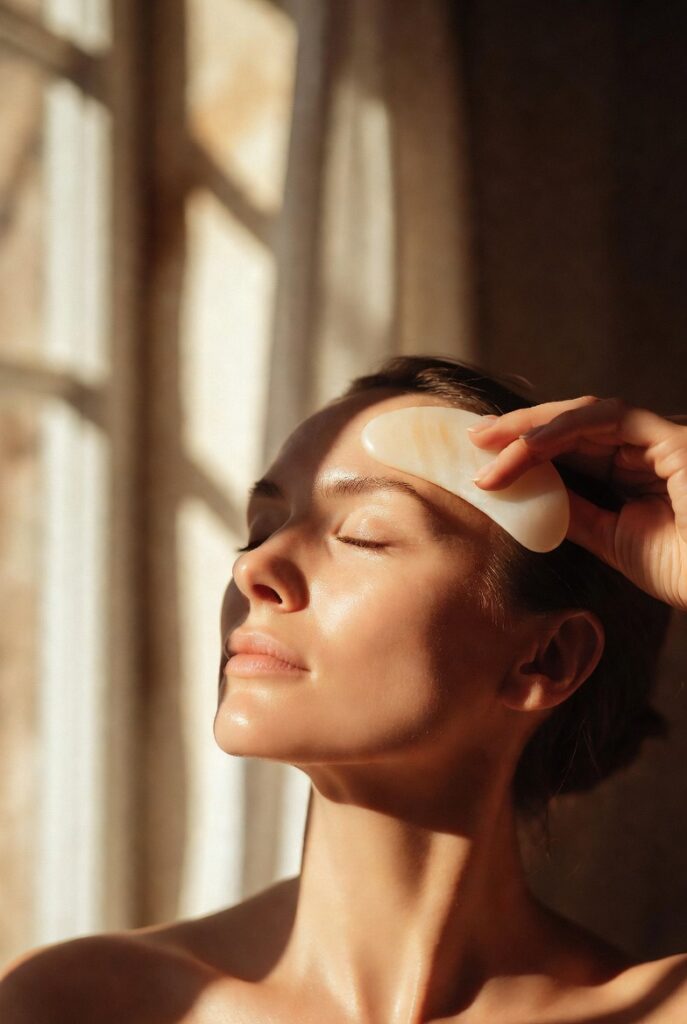
The forehead often gets neglected, yet it’s a prime spot for fluid retention and stress lines. Start with horizontal strokes. Place the tool’s long edge above your brows, and glide from the center outward to your temples. Repeat five times, overlapping each pass by half. Then switch to vertical strokes from your brows up into the hairline. This crosshatch pattern ensures no pocket of stagnation remains. Keep your strokes slow and your tool flat; pressing with the edge creates temporary grooves that defeat the purpose. If you have prominent forehead lines, be especially gentle. You’re not trying to iron them away aggressively. Instead, you’re encouraging the tissue to soften and the fascia to release its grip. Over months, horizontal expression lines often become less etched because the skin is no longer adhered to tight underlying layers.
After the sweeping, use the tool’s scalloped edge (if yours has one) to gently rake from the hairline down to the brows. This mimics a gua sha facial massage technique used in traditional Chinese medicine for sinus pressure and mental fog. You might hear soft crunching sounds—that’s normal as fascia releases. Many people report feeling clearer-headed after this segment, almost as if they’ve just stepped out of a nap. The forehead rarely gets solo attention in skincare, but inside a complete routine, it becomes a reset button for your whole expression. If you suffer from sinus headaches or seasonal congestion, try spending an extra minute on the forehead. The gentle raking can help move stagnant fluid trapped in the frontal sinuses. It’s not a medical treatment, but countless users find real relief. And even without sinus issues, the forehead work simply feels good. There’s something about slow, repetitive strokes on that broad surface that quiets mental chatter. You might find yourself looking forward to this step more than the cheekbones.
7. Cooling Down and Sealing the Practice
Your final step is not more scraping—it’s quiet integration. Wipe off excess oil with a warm, damp cloth or leave a thin layer if your skin is dry. Then use your clean hands to press the remaining warmth and oil into your face. Start at the center and smooth outward, mirroring the strokes you just made. This signals to your nervous system that the work is done. Without this cooldown, the skin can feel overstimulated, and the muscles might stay semi-contracted. Think of it like the stretching after a workout. Some people like to finish with a few deep breaths, placing their palms over their eyes. That’s a beautiful way to seal the ritual. You’re telling your body, “We’re safe now. We can integrate.”
Finally, observe without judgment. Look in a mirror and notice whether your jaw feels softer, your cheeks slightly lifted, your brow more at ease. A gua sha complete routine is not about immediate perfection but about cumulative shift—less puffiness each morning, fewer tension headaches each week, and a moment of self-care that belongs only to you. Do this sequence three to five times weekly, and within a month, the ritual becomes second nature. Your face will tell you when you’ve found your rhythm. Maybe you’ll notice that you sleep better on nights you practice. Maybe your makeup applies more smoothly because your skin texture has improved. Maybe you simply feel more connected to yourself. All of these are real, valid results. And if you miss a few days, don’t guilt yourself. The stone will be waiting. Your face remembers the movements. Just begin again.
Read More: 16 Natural Makeup Black Women Look Tips: Unlock Your Glowing, Confident, Everyday Radiance
Conclusion
A proper gua sha complete routine is more than a fleeting beauty trend—it’s a return to slow, intentional care that honors both skin and spirit. When you consistently work the neck, jaw, cheeks, eyes, and forehead in that order, you’re not just sculpting your features; you’re unwinding stored stress and inviting calm into your daily life. The results build quietly: less bloating, softer expression lines, and a glow that radiates from improved circulation rather than expensive creams. Keep your tool clean, your touch gentle, and your strokes unhurried. Over time, this seven-part journey becomes as natural as brushing your teeth, and far more rewarding. Your most luminous, relaxed face is waiting—one smooth glide at a time. Start tonight with just the neck and collarbone strokes, and let the rest unfold naturally. You don’t need to be perfect. You just need to begin.